Hello my crafty friends I hope you're all fine and dandy. It's been a while since my last post things are a little busy here with one thing or another. Amy had her birthday last week can't believe she is 24it's gone so quickly, I did say to Phil the other day as we past her old junior school that the one thing I don't miss is the school run at all. Picture it my house in the middle the school is one end my place of work is the other Phil had the car for work as he needed it so it was walk Amy to school then walk all the way back past home to get to work on time(8.45am) they hadn't started the breakfast club then and Amy being Amy she wouldn't have gone anyway so luckily they always let her in or there was always a friend to stay with in the playground, no I do not miss those days(especially the wet ones)
Anyway I have been doing a little bit of crafting in the free time I have had and have a quick little tutorial for you all as I thought you might like it.
 This is what I made Friday night I was sitting here as you do trying to get my mojo into gear and deciding what card to make when I had the light bulb moment a PIRATE CARD it's been ages since I made one the last one was the Johnny Depp inspired one you can find here(my old blog)
I have an image to use so all I need are my embellishments......?????????????? A treasure chest but how???
I found the how to on youtube and thought I would have a go
all you need is some thin card a hot glue gun scissors pencil ruler
seed beads stain embossing powder (optional) something to fill the chest wet glue(other than glue gun) and glitter the chunky kind

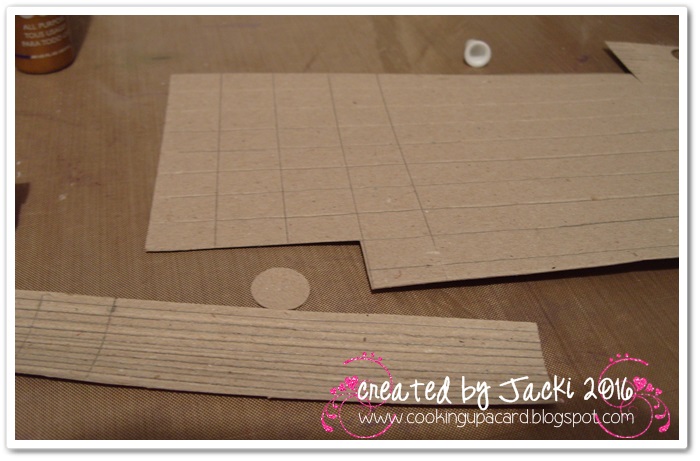
 So take your card and measure and make a grid of oblongs ¾" x ½" you need 9 in a grid on the 4 outer ones measure in at a 16th of an inch as shown in the pic above then cut out
 you will be left with this shape score along the inner square and fold upwards
 using your hot glue gun stick together by gluing the smaller sides and attaching to the slanted sides these will be taller than the the other 2 sides but you cut to fit it just gives a more chest shape

Go over all seams with wet glue a tacky glue is best and it helps to hide the seams especially if you use a slightly corrugated card and allow to dry
now for the lid
you need a strip of the same card about ¾" wide and the size of chest and a small circle I punched mine using about a ½" circle punch and cut in half
 score length ways along the lid and curve then hot glue to the circles
 then add to the chest with glue gun and add wet glue to seam
 next you need to take some very thin card and cut really thin strips these are about 16th of an inch I cut 3 at A5 size just to make sure I had enough but 2 should be plenty
then colour them with stain and if your chest is dry colour this as well
 I then decided to heat emboss these strips with black powder to give a little more texturebut like I said this is optional

 then cut the strips to the length of the front of chest and also the top of lid. If the chest is going tobe on show in all directions then add to the back as well but as mine will be added to a card I didn't put on the back
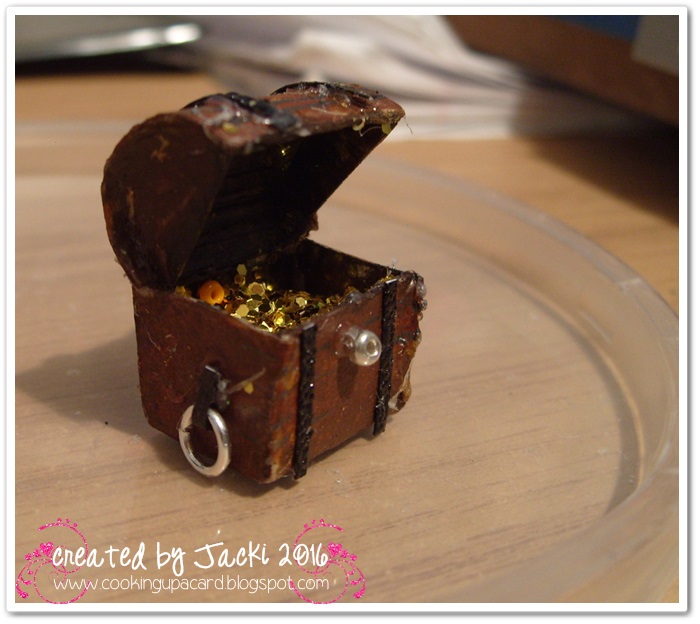
 now as you will be filling the chest and it will take a few beads so I used one of these wall plugs cut in ½ then filled with hot glue when the glue is cooling sprinkle on some seed beads these will look like treasure poking through then add some tacky glue and sprinkle on chunky glitter to like gold pieces


 Then you need to take 2 jump rings add a small piece of the strips to the ring glue in place then add to the sides of your chest to look like carry handles and then add a silver seed bead to the centre of the chest front as a lock

 you can see (hopefully) by this pic the effect of the embossing on the strips then I took a black gel pen and drew some lines here and there over the chest to give a woody effect

and there you have it hope you like it and can follow the tutorial
see you soon
Happy crafting
Challenges
http://avenue613.blogspot.co.uk/ anything goes (twist of beach or nautical) treasure chest being nautical
http://cagichallenge.blogspot.co.uk/ make your own embellishments (this is for a card to come)
http://crafting-with-friends.blogspot.co.uk/ ATG

Anyway I have been doing a little bit of crafting in the free time I have had and have a quick little tutorial for you all as I thought you might like it.

I have an image to use so all I need are my embellishments......?????????????? A treasure chest but how???
I found the how to on youtube and thought I would have a go
all you need is some thin card a hot glue gun scissors pencil ruler
seed beads stain embossing powder (optional) something to fill the chest wet glue(other than glue gun) and glitter the chunky kind


Go over all seams with wet glue a tacky glue is best and it helps to hide the seams especially if you use a slightly corrugated card and allow to dry
now for the lid
you need a strip of the same card about ¾" wide and the size of chest and a small circle I punched mine using about a ½" circle punch and cut in half


then colour them with stain and if your chest is dry colour this as well


and there you have it hope you like it and can follow the tutorial
see you soon
Happy crafting
Challenges
http://avenue613.blogspot.co.uk/ anything goes (twist of beach or nautical) treasure chest being nautical
http://cagichallenge.blogspot.co.uk/ make your own embellishments (this is for a card to come)
http://crafting-with-friends.blogspot.co.uk/ ATG
5 comments:
Oh wow, hun......that's fantastic.....and a great tutorial too! You deserve a nice, hot cuppa & a slice of cake for that......battenburg or lemon drizzle? Hope all is well with you & yours......and a belated happy birthday to your daughter!
hugs Jo x
WOW WOW WOW I can't make up my mind whether the best thing is the look and contents or the fact it is so small a piece to work with, you must have ENORMOUS patience. It really is a fabulous piece of work so many fabulous details.
Such a wonderful creation with great attention to detail . Thanks for joining us at Come And Get It challenge.Neva
Hi Jacki. Oh my goodness me, your talents are never ending. This is absolutely stunning. JUST FABULOUS.
Happy crafting.
Love
Sandra xxxx
A gorgeous project!
Thank you soo much for taking part in our "make your own embellishments” challenge over at Come and Get it.
Hope to see you again in our new challenge as well…
Hugs,
Melanie
(DT-Coordinator Creatalicious Challenges)
(DT Come and Get It)
(DT Crafty Friends)
PS: Sorry for the late comment, life had been very hectic the past couple of weeks…
Post a Comment